Adding Telemetry to a Bot
botframework application-insights
Building a chatbot is fun. Running it in production can be even more entertaining, but the golden rule always stays the same - no chatbot ever survives first encounter with real user. This post is about telemetry and how to know what's going on.
November 1, 2017
Building a chatbot is fun. Running it in production can be even more entertaining, but the golden rule always stays the same - no chatbot ever survives first encounter with real user. That's why it's necessary to track, monitor and adjust the conversation flow as your users enter their first questions and don't understand their first answers...
Imagine a conversation like this:
[Bot] Is there something I can help you with?
[User] Yes
[Bot] Sorry, I can't answer this question. Is there something else you would like to ask?
[User] Yes
[Bot] Sorry, I can't answer this question. Is there something else you would like to ask?
[User] OMG, just go away...
[Bot] That's weird... I couldn't find anything that would match your question. Care to try again with different words?
Flaws in the conversation like this can be very frustrating to the user. But the good news is that they usually show up rather quickly. So how can you be in the know?
Let's set up telemetry for a chatbot built using Microsoft Bot Framework and the C# SDK.
Application Insights
In Azure, the universal solution for web application telemetry is called Application Insights. And since any chatbot is also a web application (Web API to be precise), it's only logical to use it as well.
If you don't have an Azure account, you can get one for free by registering for a Trial subscription.
-
Log in to the Azure Portal.
-
Click +New in the left pane.
-
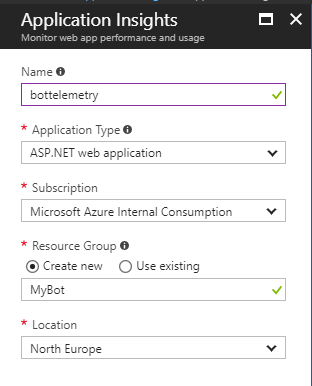
Search for Application Insights and create a new Application Insights resource.
- Application Type will be ASP.NET web application or Node.js application, depending on which SDK you are using (I use C#, so I would pick ASP.NET).
- Resource Group is usually the same as the one where your bot is.
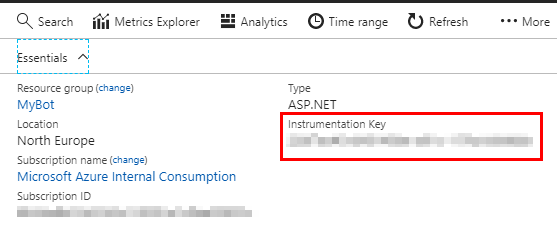
Once created, copy the Instrumentation Key from the Essentials block.
-
Go to the Bot Framework portal and sign in.
-
Select your bot (or create one).
-
Go to Settings.

-
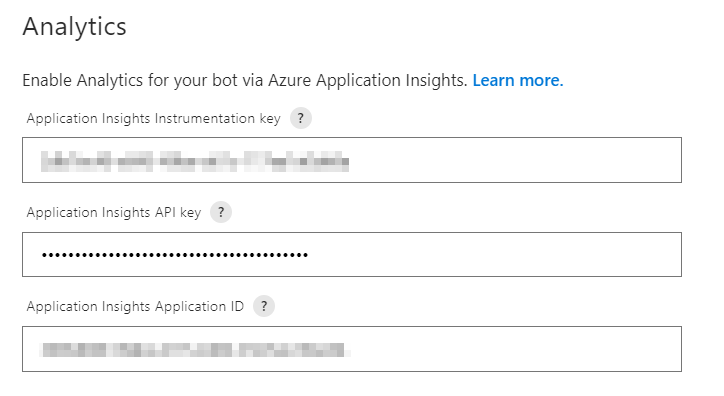
Scroll all the way down until you reach the Analytics section.
-
Paste the Instrumentation Key to the respective field.
API Key & Application ID
You don't have to fill in the API Key and Application ID fields if you only want to consume the telemetry from Azure portal. To enable the Analytics section at the Bot Framework portal, you should enter these two values as well.
-
Go to your Application Insights resource in Azure Portal.
-
Find the API Access section (under Configure).
-
Copy the Application ID value and paste it to the Application ID field in your bot's Settings.
-
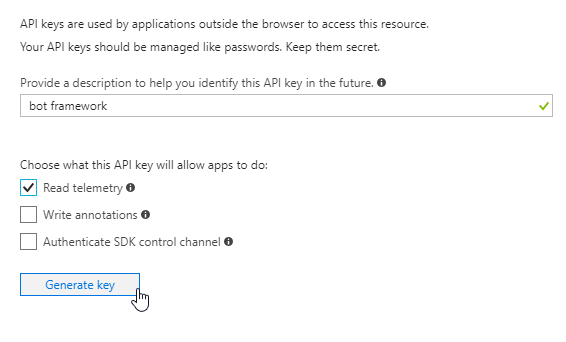
Create API key with a descriptive name (such as "bot framework") and give it the Read telemetry permission.
-
Copy the key and paste it to the API key field in your bot's Settings.
-
Click Save changes to modify your bot.

Basic telemetry and usage information should now appear in the Bot Framework portal.
Custom Events
We managed to get to this point without a single code change. To get even more information and be able to analyze what messages users are sending to the bot and how far in the conversation structure they've got, you need to include the Application Insights SDK and send custom events.
- Open your bot poject in Visual Studio.
- Right click the project in Solution Explorer.
- Select Add > Application Insights Telemetry...
- Click Start Free and wait for your account information to load.
- Select your previously created Application Insights resource.
- Click Register.
Visual Studio will now add the SDK with other necessary components to your projects and it will register it with the resource.
Let's add the individual message tracking.
- Open MessagesController.cs.
- Add this code to the Post() method to the place where you start message processing:
var telemetryClient = new TelemetryClient();
telemetryClient.TrackEvent("Message", new Dictionary<string, string>() { { "Text", activity.Text } });
At the end, the Post method can look for example like this:
public async Task<HttpResponseMessage> Post([FromBody]Activity activity)
{
    if (activity.Type == ActivityTypes.Message)
    {
        var telemetryClient = new TelemetryClient();
        telemetryClient.TrackEvent("Message", new Dictionary<string, string>() { { "Text", activity.Text } });

        await Conversation.SendAsync(activity, () => new MainDialog());
    }
    else
    {
        HandleSystemMessage(activity);
    }
    var response = Request.CreateResponse(HttpStatusCode.OK);
    return response;
}
Run the bot and try sending some messages.
Analysis
To monitor the messages, open Azure Portal and go to your bot telemetry Application Insights resource.
Select Analytics and try this query:
union customEvents,pageViews
| where timestamp > ago(3d)
| where (name == "Message")
| top 100 by timestamp desc
| project timestamp, name, customDimensions
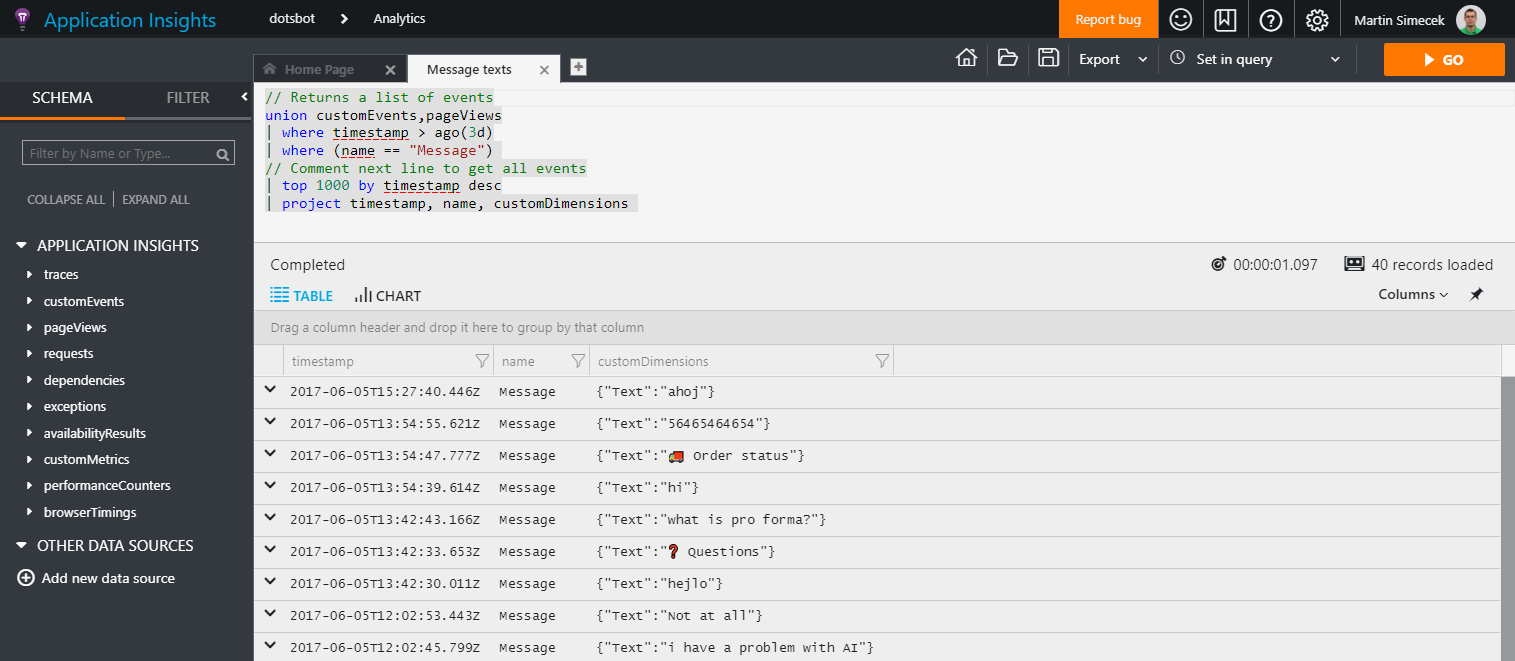
Results are limited by both age (less than 3 days) and count (top 100).
If you want to see, which parts of the conversation are more popular, modify the query to count distinct messages for you:
// Returns a list of events
union customEvents,pageViews
| where timestamp > ago(30d)
| where (name == "Message")
// Comment next line to get all events
| top 100 by timestamp desc
//| project timestamp, name, customDimensions.Text
| summarize count(customDimensions.Text) by tostring(customDimensions.Text)
| order by ['count_customDimensions_Text']
And then display the results as Chart:
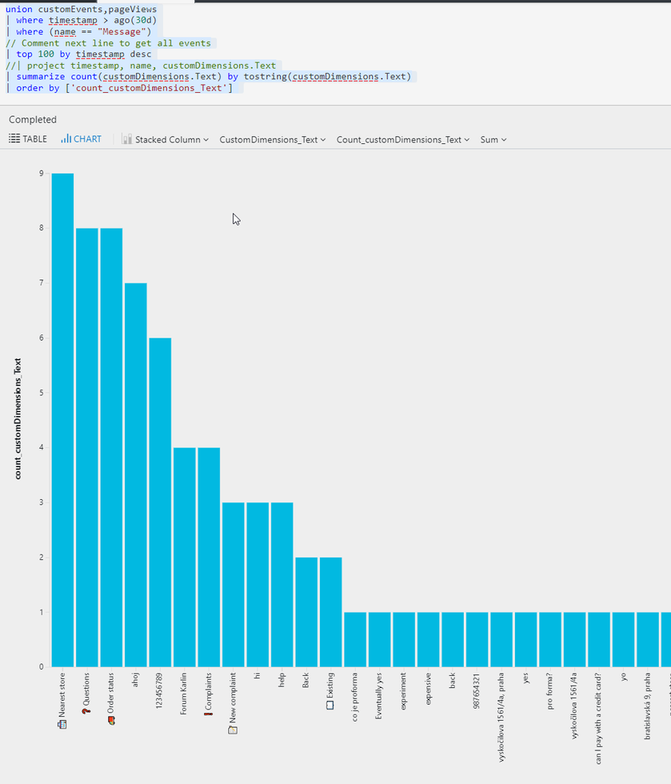
That's it! Now just sit back, monitor and adjust the conversation flow.
Feedback
Found something inaccurate or plain wrong? Was this content helpful to you? Let me know!
📧 codez@deedx.cz