OpenVPN tunnel with Microsoft Azure
azure vpn open-vpn
How I used Microsoft Azure and OpenVPN to create my own VPN tunel, for just a few EUR/month.
April 16, 2019
I'm sure you know the feeling. At the airport, connecting to their free Wi-Fi, no password, zero encryption, hoping it's not just some pineapple, sniffing your packets. And even though most of the communication done over the internet these days is encrypted, it still doesn't feel right.
How about wireless networks at hotels? Need to get some work done, but ouch, RDP is blocked... Only HTTP/HTTPS for you this time. Besides security (which suffers from the same issues as the aiport), limited connectivity is a legitimate reason to start thinking about personal VPN.
Public VPN providers are blooming, but their subscription pricing models are not suitable for me, because I don't need VPN for everyday work, just occasionaly when travelling or when connecting to a non-trusted network. (And also, I wanted to build my own!)
The Goal:
Since I'm very close to Microsoft Azure, I decided to combine OpenVPN and Ubuntu virtual machine in the cloud to create an encrypted tunnel to the internet. Once connected all traffic from my device (PC or phone) will use port 443 to get through this tunnel to Azure and then to the internet. I will have full control over the infrastructure and will be able to turn it on and off on demand. Everything will const only a few €/month.
Outline
- Attribution
- Azure Resources
- Setup inside VM
- OpenVPN installation & config
- Generating keys
- Client keys
- Add new client
- Connect client
- Tips, remarks
Attribution
Two articles served as guidance to this setup and they deserve credit for the scripting part:
- DigitalOcean - How to set up an OpenVPN server on Ubuntu
- Root.cz - Nasazujeme OpenVPN snadno a rychle
I compiled this information, along with my Azure insights, into this step-by-step guide for future reference.
Azure Resources
Let's begin by creating Ubuntu 18.04 LTS virtual machine in Microsoft Azure, either in the portal, or using Azure CLI.
I chose the second smallest general-purpose size B1S (1 CPU, 1 GB RAM), with Standard HDD in the Managed mode, which worked fine for my wokloads and was very cheap.
Before logging onto the machine, I opened two (actually three) ports in Azure firewall from the Networking blade:
- TCP/22 (SSH) - for management
- Any/443 (HTTPS) - for tunneling; to be able to switch between TCP and UDP freely, I chose Any
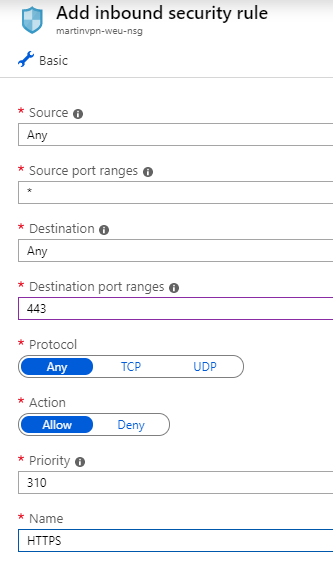
Note: This can be done during VM creation as well.
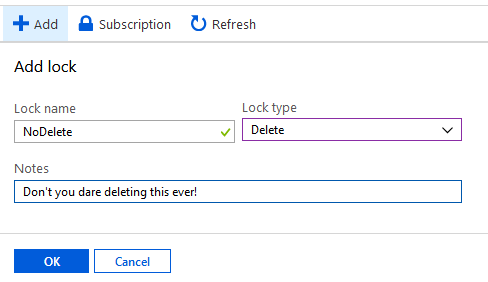
I also set up a Lock on the resource group to prevent me from deleting my VPN VM accidentaly (yes, that happens...).
Finally, I configured DNS name for this VM, because public IP address will change after shutdown (and also it's easier to remember).

With Azure infrastructure set up it was time to connect to the VM and start OpenVPN setup.
Note: These steps mostly replicate DigitalOcean's how to guide linked above. I keep them here for easier reference. They are slightly modified.
Setup inside VM
ssh myusername@myvmname.northeurope.cloudapp.azure.com
(Change to your admin user name and your DNS name and region.)
sudo apt-get update
sudo apt-get upgrade
Check if firewall is present (should be inactive):
sudo ufw status
Status: inactive
Add firewall rules:
sudo ufw allow OpenSSH
sudo ufw allow 443/udp
sudo ufw allow 443/tcp
sudo ufw disable
sudo ufw enable
sudo ufw status

Status: active

To                         Action      From
--                         ------      ----
OpenSSH                    ALLOW       Anywhere
443/udp                    ALLOW       Anywhere
443/tcp                    ALLOW       Anywhere
OpenSSH (v6)               ALLOW       Anywhere (v6)
443/udp (v6)               ALLOW       Anywhere (v6)
443/tcp (v6)               ALLOW       Anywhere (v6)
Let's pause a little bit here.
- Why configuring firewall when we did it earlier in Azure? We will use UFW to route traffic through this VPN server. Azure firewall is on a different layer than operating system firewall. You always have to configure both.
- Why both UDP and TCP? As mentioned earlier - just for the sake of flexibility, to be able to switch between TCP and UDP tunelling. In my final setup, I removed UDP completely and worked only with TCP.
OpenVPN installation & config
sudo apt-get install openvpn easy-rsa
cp -r /usr/share/easy-rsa ~/
cd ~/easy-rsa
ln -s openssl-1.0.0.cnf openssl.cnf
Generating keys
Certificate Authority
nano vars
Change variables describing the certificate:
...
export KEY_COUNTRY="CZ"
export KEY_PROVINCE=""
export KEY_CITY="Prague"
export KEY_ORG="MyOrg"
export KEY_EMAIL="me@myhost.mydomain"
exprt KEY_OU="MyOU"
...
Optionally change expiration times (default is 10 years):
...
export CA_EXPIRE=3650
export KEY_EXPIRE=3650
...
Exit and save (Ctrl + X, yes, enter).
Server certificate
source vars
./clean-all
./build-ca

Generating a 2048 bit RSA private key
..........................................................................................+++
...............................+++
writing new private key to 'ca.key'
-----
You are about to be asked to enter information that will be incorporated
into your certificate request.
What you are about to enter is what is called a Distinguished Name or a DN.
There are quite a few fields but you can leave some blank
For some fields there will be a default value,
If you enter '.', the field will be left blank.
-----
Because all of the fields were specified in vars, it's just about doing Enter, Enter, Enter...
./build-key-server mujserver
Enter, Enter, Enter...
When asked to set password, don't fill anything and just continue.
The Subject's Distinguished Name is as follows
countryName           :PRINTABLE:'CZ'
localityName          :PRINTABLE:'Prague'
organizationName      :PRINTABLE:'MyOrg'
organizationalUnitName:PRINTABLE:'MyOU'
commonName            :PRINTABLE:'mujserver'
name                  :PRINTABLE:'EasyRSA'
emailAddress          :IA5STRING:'me@myhost.mydomain'
Certificate is to be certified until Apr 13 12:41:07 2029 GMT (3650 days)
Sign the certificate? [y/n]:y


1 out of 1 certificate requests certified, commit? [y/n]y
Write out database with 1 new entries
Data Base Updated
Continue:
./build-dh
Generating DH parameters, 2048 bit long safe prime, generator 2
This is going to take a long time
.....................................................+.........................................................................................................................................+.....
(Diffle-Hellman key generation can take a few minutes.)
Check
In the ~/easy-rsa/keys folder there should be several certificates and keys now. Most important are:
- ca.key
- ca.crt
- dh2048.pem
- mujserver.crt
- mujserver.key
Configure OpenVPN
cd ~/easy-rsa/keys
sudo cp ca.crt mujserver.crt mujserver.key dh2048.pem /etc/openvpn
gunzip -c /usr/share/doc/openvpn/examples/sample-config-files/server.conf.gz | sudo tee /etc/openvpn/server.conf
sudo nano /etc/openvpn/server.conf
Changes:
...
port 443 # changed port
;proto udp # added ;
proto tcp # removed ;
...
ca ca.crt
cert mujserver.crt # changed to mujserver
key mujserver.key  # changed to mujserver
...
server 192.168.222.0 255.255.255.0 # changed IP
...
push "redirect-gateway def1 bypass-dhcp" # removed ;
...
push "dhcp-option DNS 1.1.1.1" # added CloudFlare DNS provider as new line
...
;tls-auth ta.key 0 # added ;
...
user nobody # removed ;
group nogroup # removed ;
...
explicit-exit-notify 0 # changed 1 to 0, because we're using TCP
(Optional) HMAC
If you want to be proper secure you can also set up HMAC keys (as DigitalOcean suggests). I didn't do it, so please refer to the original guide if interested.
Configure networking
Forwarding all client traffic:
sudo nano /etc/sysctl.conf
Uncomment:
net.ipv4.ip_forward=1
Apply for current session:
sudo sysctl -p
Configure UFW:
ip route | grep default
> default via 10.0.4.1 dev eth0 proto dhcp metric 100

sudo nano /etc/ufw/before.rules
Note eth0.
Add:
...
# OPENVPN
# NAT table
*nat
:POSTROUTING ACCEPT [0:0]
-A POSTROUTING -s 192.168.222.0/8 -o eth0 -j MASQUERADE
COMMIT
# END OPENVPN

# Don't delete these required lines, otherwise there will be errors
...
(Used -o eth0.)
Then:
sudo nano /etc/default/ufw
Change default forward policy to ACCEPT:
DEFAULT_FORWARD_POLICY="ACCEPT"
Reload UFW:
sudo ufw disable
sudo ufw enable
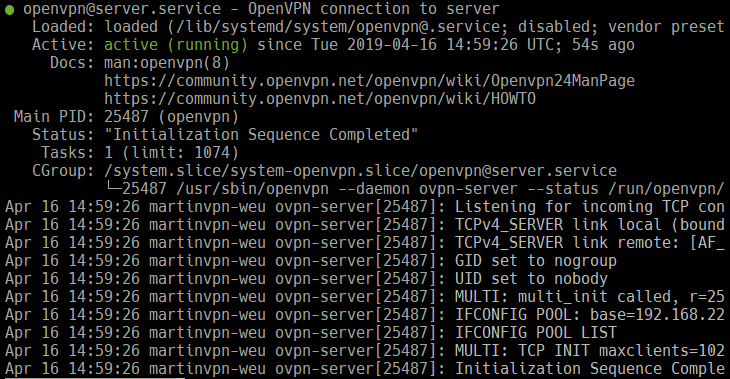
Start OpenVPN service
sudo systemctl start openvpn@server
sudo systemctl status openvpn@server
Note: If something goes wrong and OpenVPN doesn't start, try
journalctl -xeand check for error messages.
Start OpenVPN automatically:
sudo systemctl enable openvpn@server
Client keys
Adding clients is now easy. Each machine will need a OpenVPN configuration file with it's own certificate/key pair. Let's prepare the infrastructure first.
mkdir -p ~/easy-rsa/clients
chmod 700 ~/easy-rsa/clients
cp /usr/share/doc/openvpn/examples/sample-config-files/client.conf ~/easy-rsa/clients/base.conf
nano ~/easy-rsa/clients/base.conf
Changes:
...
proto tcp
;proto udp
...
remote mujvpnserver.northeurope.cloudapp.azure.com 443
...
;ca ca.crt
;cert client.crt
;key client.key
...
;tls-auth ta.key 1
Helper script to generate OVPN configuration file:
nano ~/easy-rsa/clients/make_config.sh
#!/bin/bash

# First argument: Client identifier

KEY_DIR=~/easy-rsa/keys
OUTPUT_DIR=~/easy-rsa/clients/files
BASE_CONFIG=~/client-config/base.conf

cat ${BASE_CONFIG} \
    <(echo -e '<ca>') \
    ${KEY_DIR}/ca.crt \
    <(echo -e '</ca>\n<cert>') \
    ${KEY_DIR}/${1}.crt \
    <(echo -e '</cert>\n<key>') \
    ${KEY_DIR}/${1}.key \
    <(echo -e '</key>') \
    > ${OUTPUT_DIR}/${1}.ovpn
chmod 700 ~/easy-rsa/clients/make_config.sh
Add new client
These steps will be repeated every time when adding new client to the VPN:
cd ~/easy-rsa
source vars
./build-key myphone
(You can set a password for the certificate now, if you want.)
./clients/make_config myphone
Finally, disconnect from SSH and transfer new OVPN file to your computer. You can use the SFTP command or applications like WinSCP.
sftp myusername@myvmname.northeurope.cloudapp.azure.com:easy-rsa/clients/myphone.ovpn C:\Users\myusername\Desktop\

Connect client
So far I'm using VPN on two devices: Windows 10 PC and Android phone.
Windows 10
Download OpenVPN GUI (I used Windows Installer version), install it and permit the installation of new network adapter.
Run the app, and import OVPN config file (right-click the tray icon).
Connect.
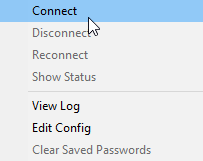
If everything went well, you should be connected in a few seconds (otherwise consult the log).


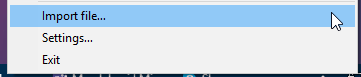
Android
Go to Play Store and install OpenVPN Connect - Fast & Safe SSL VPN Client from OpenVPN.
Transfer your OVPN file to the phone (I used USB cable, it's up to you how you prefer to do it).
Run the OpenVPN app and select OVPN Profile at the main screen.
Find your OVPN file and tap Import.
Tips, remarks
If you want to save some money, don't forget to turn your Azure VM off when not using it.
Also keep in mind that you will be charged for outbound traffic from Azure datacenter (which in is case is all traffic, since data flows both ways).
Different region? It's not always efficient to channel all traffic from Europe. There's nothing easier than setting up another identical VM in different region (Azure has plenty).
Feedback
Found something inaccurate or plain wrong? Was this content helpful to you? Let me know!
📧 codez@deedx.cz