Signal Faces
cognitive-services azure-functions
November 30, 2017
"How could your computer vision technology work as part of an art installation?"
When our friends from the Studio of Intermedia Work at the Academy of Fine Arts in Prague came to us with this question, we immediately took on the challenge. Under the creative lead of students and together with guys from Biceps Digital agency, we have built an art installation for Prague Signal Festival 2017.
SIGNAL Festival is the largest cultural event in the Czech Republic, whose unique integration of art, city space, and modern technology has drawn over 1.5 million attendees to Prague in the four years of its existence.
The goal was to create a space that broadened people’s minds and offered them not only an insight into illusionary anonymity but also a taste of technology that is the future.
tl;dr
UWP app & Azure Function send photos of people to Cognitive Services and show them who they are and what they wear.
1600 photos were analyzed. Quality of results depends mainly on lighting, distance from camera and age.
6 iterations of Custom Vision model got to the precision of 63.5% for total of 7 tags.
UWP app didn't crash once.
Azure Function didn't crash once.
Full source code can be found in a GitHub repo.
Contents
In this article:
Scenario
The installation was called Anonymous Illusion and was placed at a beautiful square in Prague's city center.
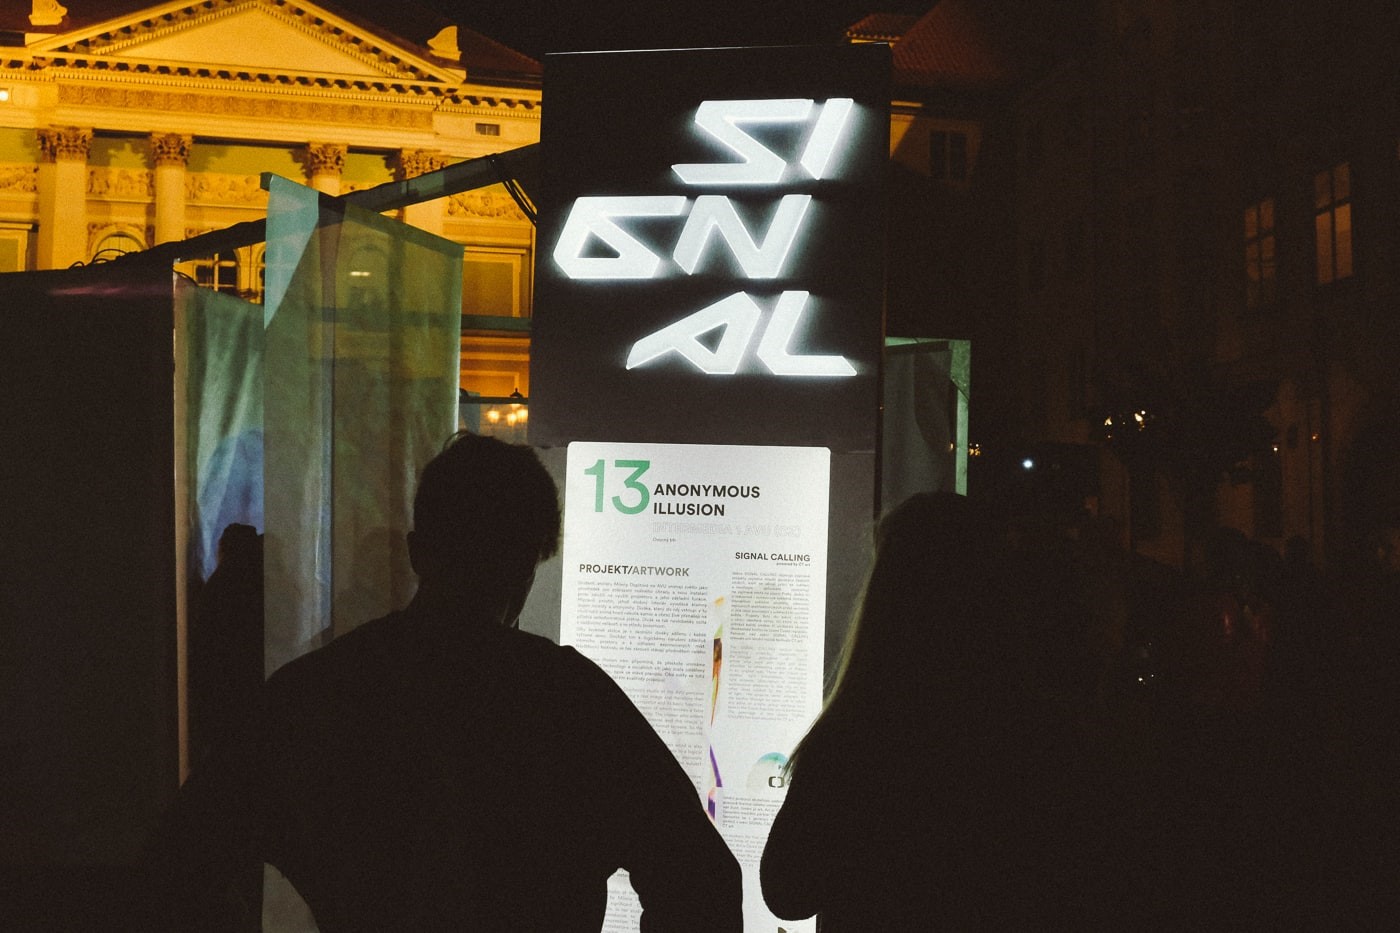
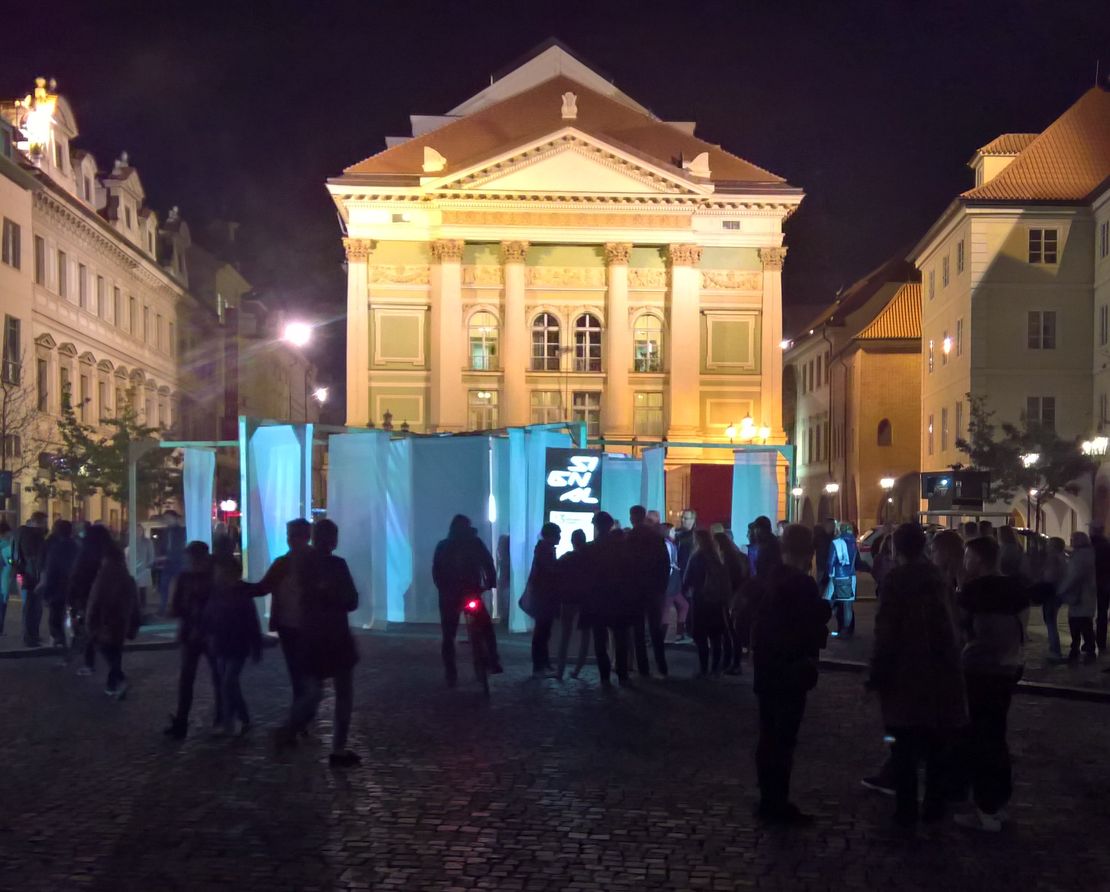
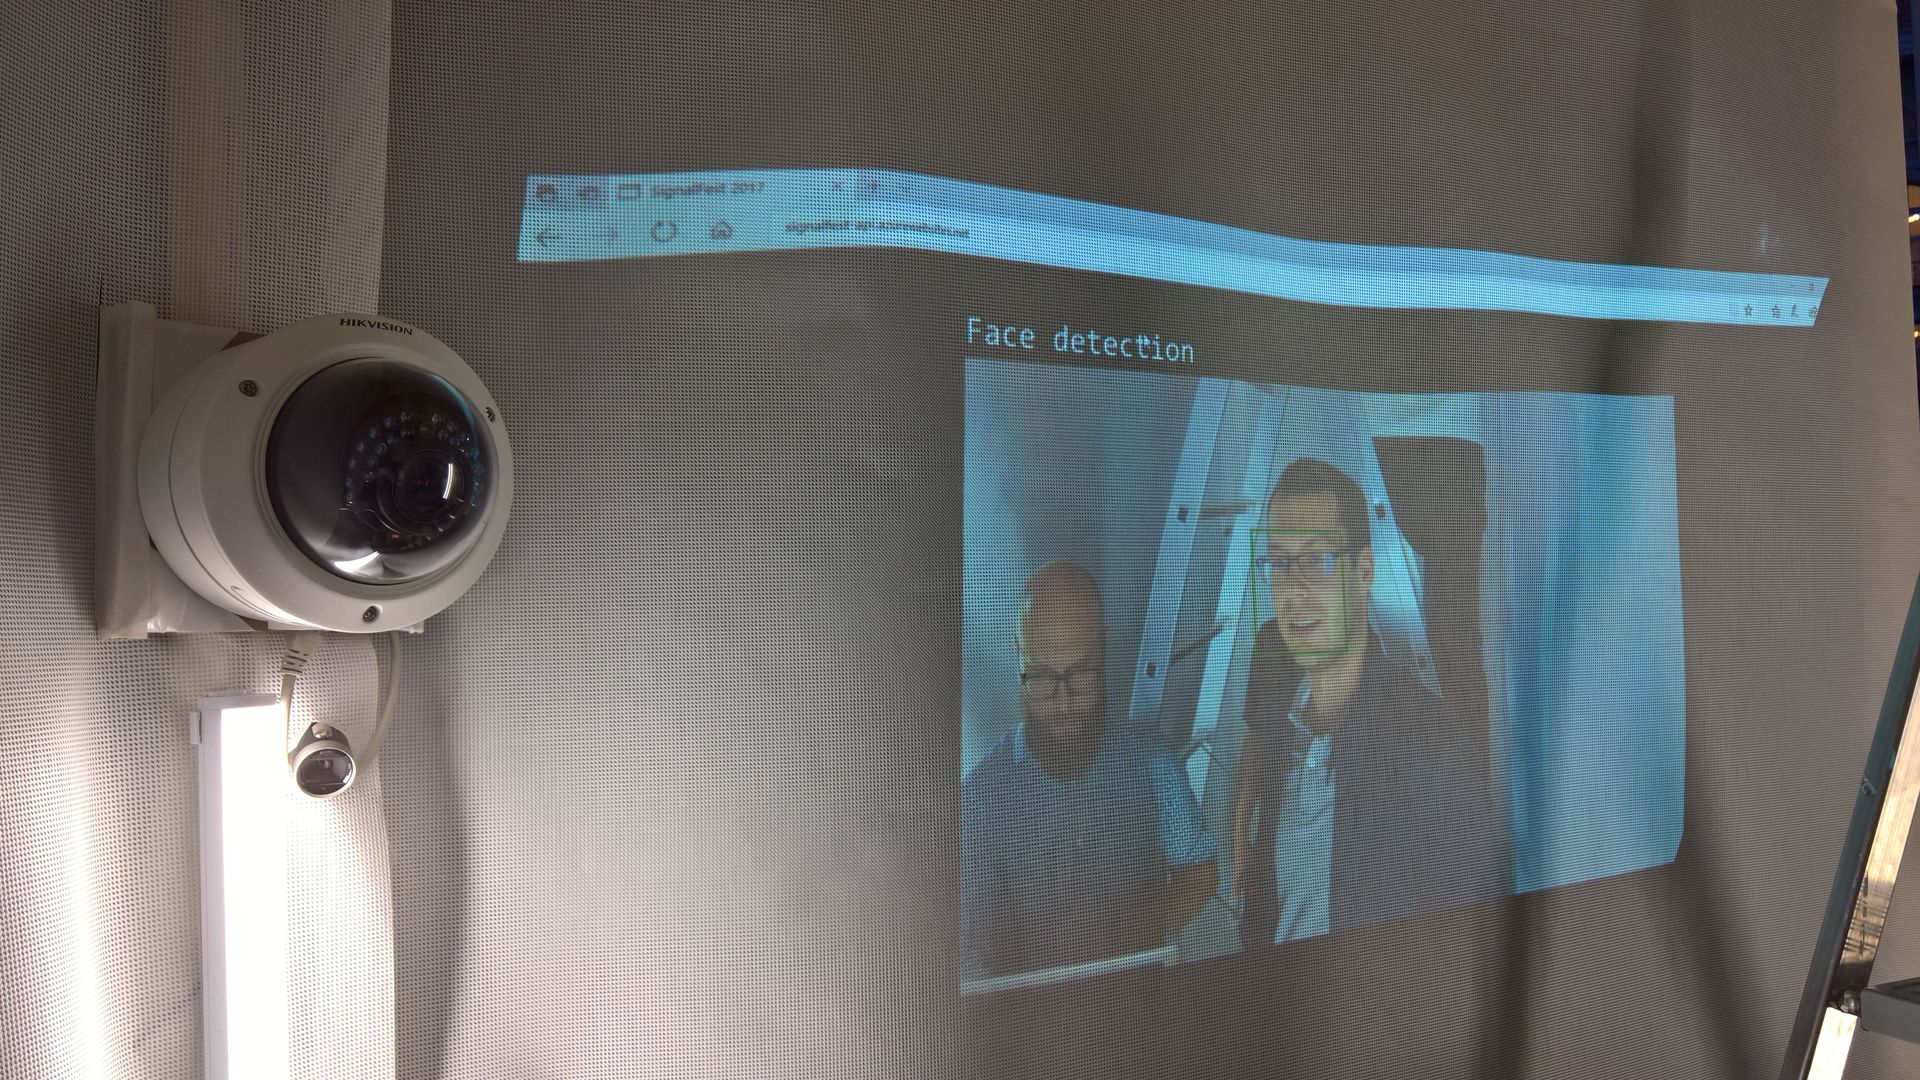
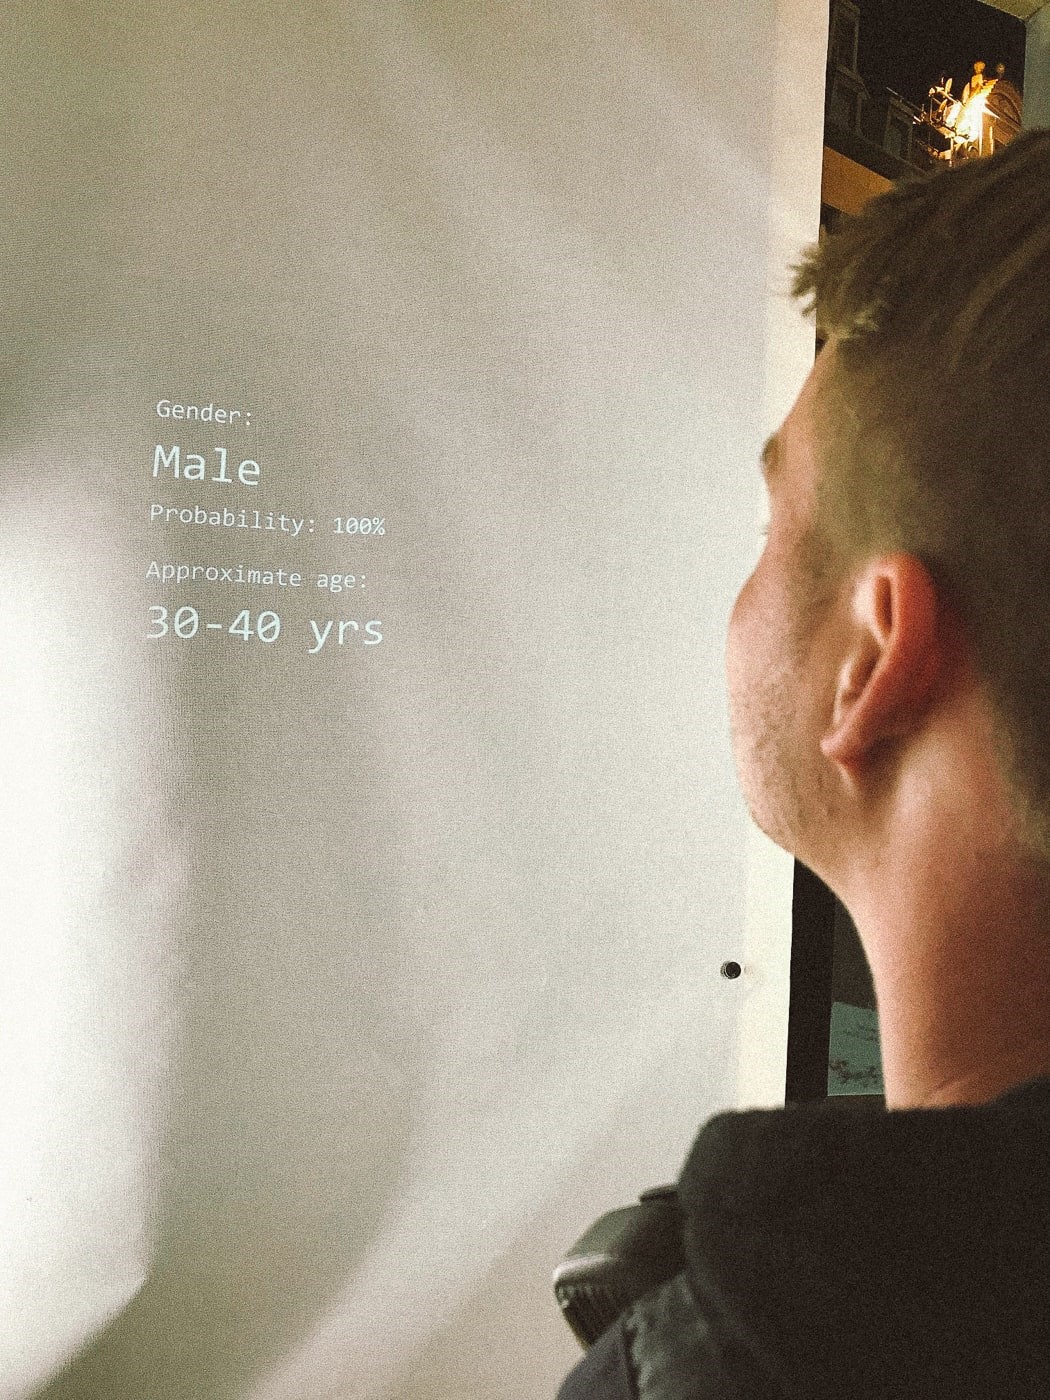
Visitors entered the enclosed white structure individually and were immediately confronted with a strong light, security camera and a projection with basic facts about the Signal Festival.
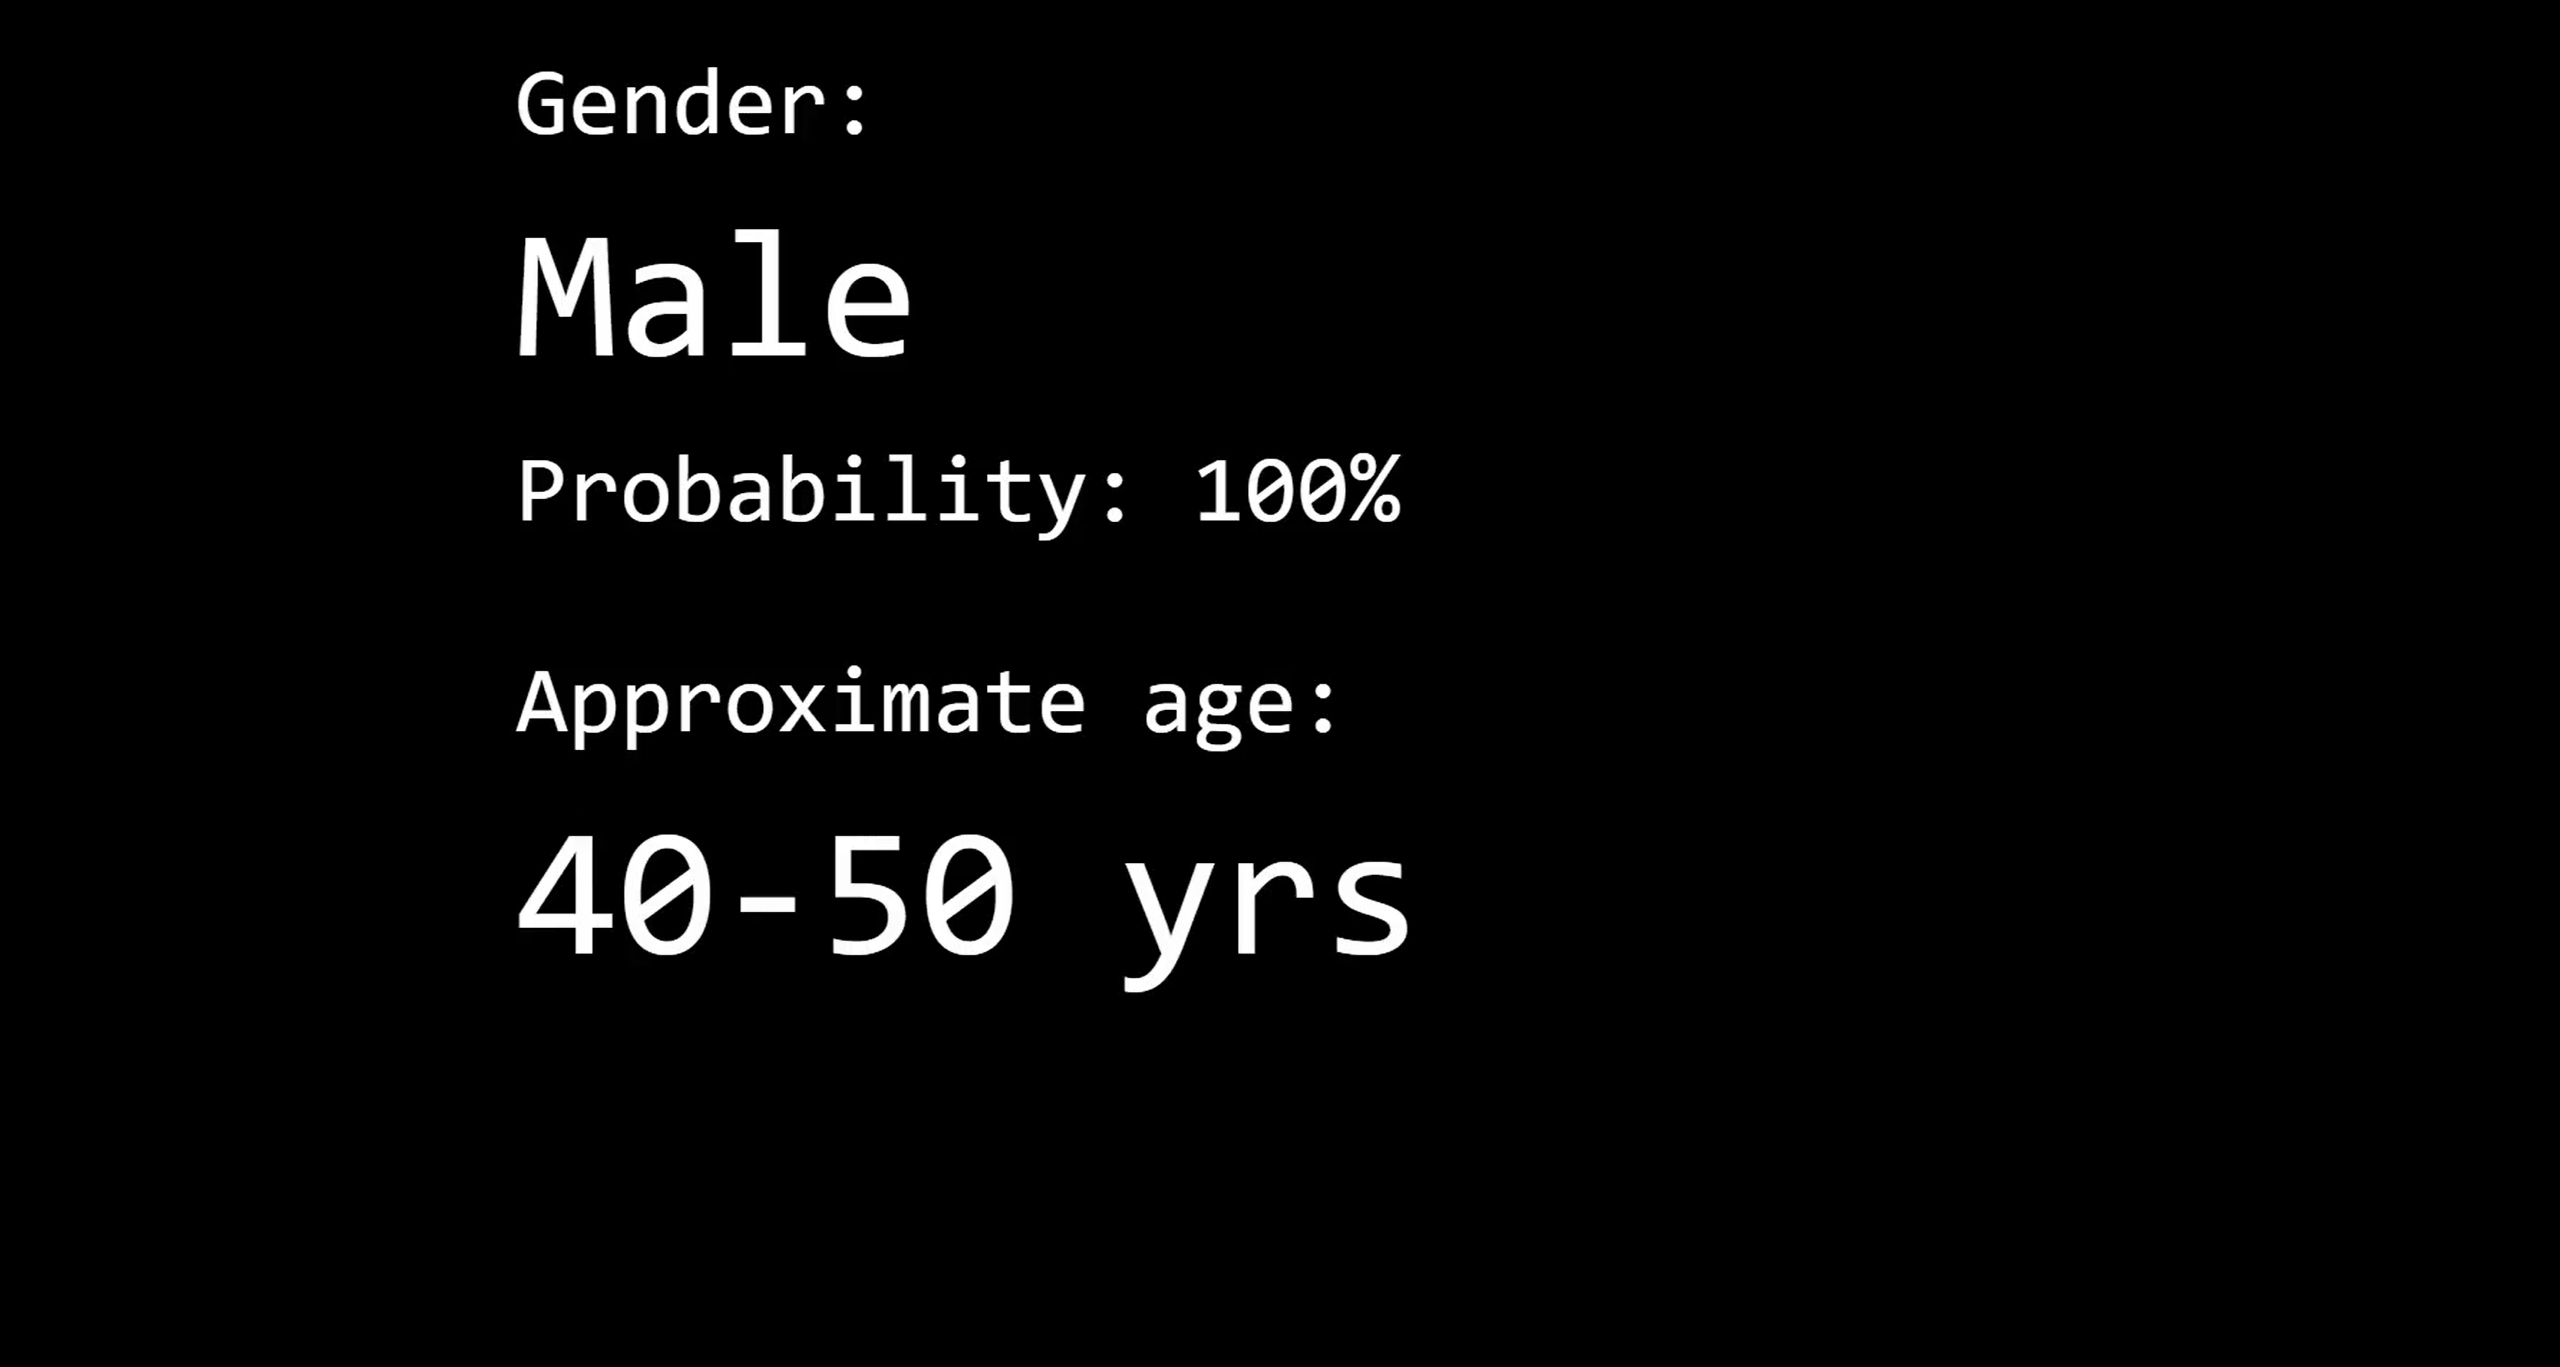
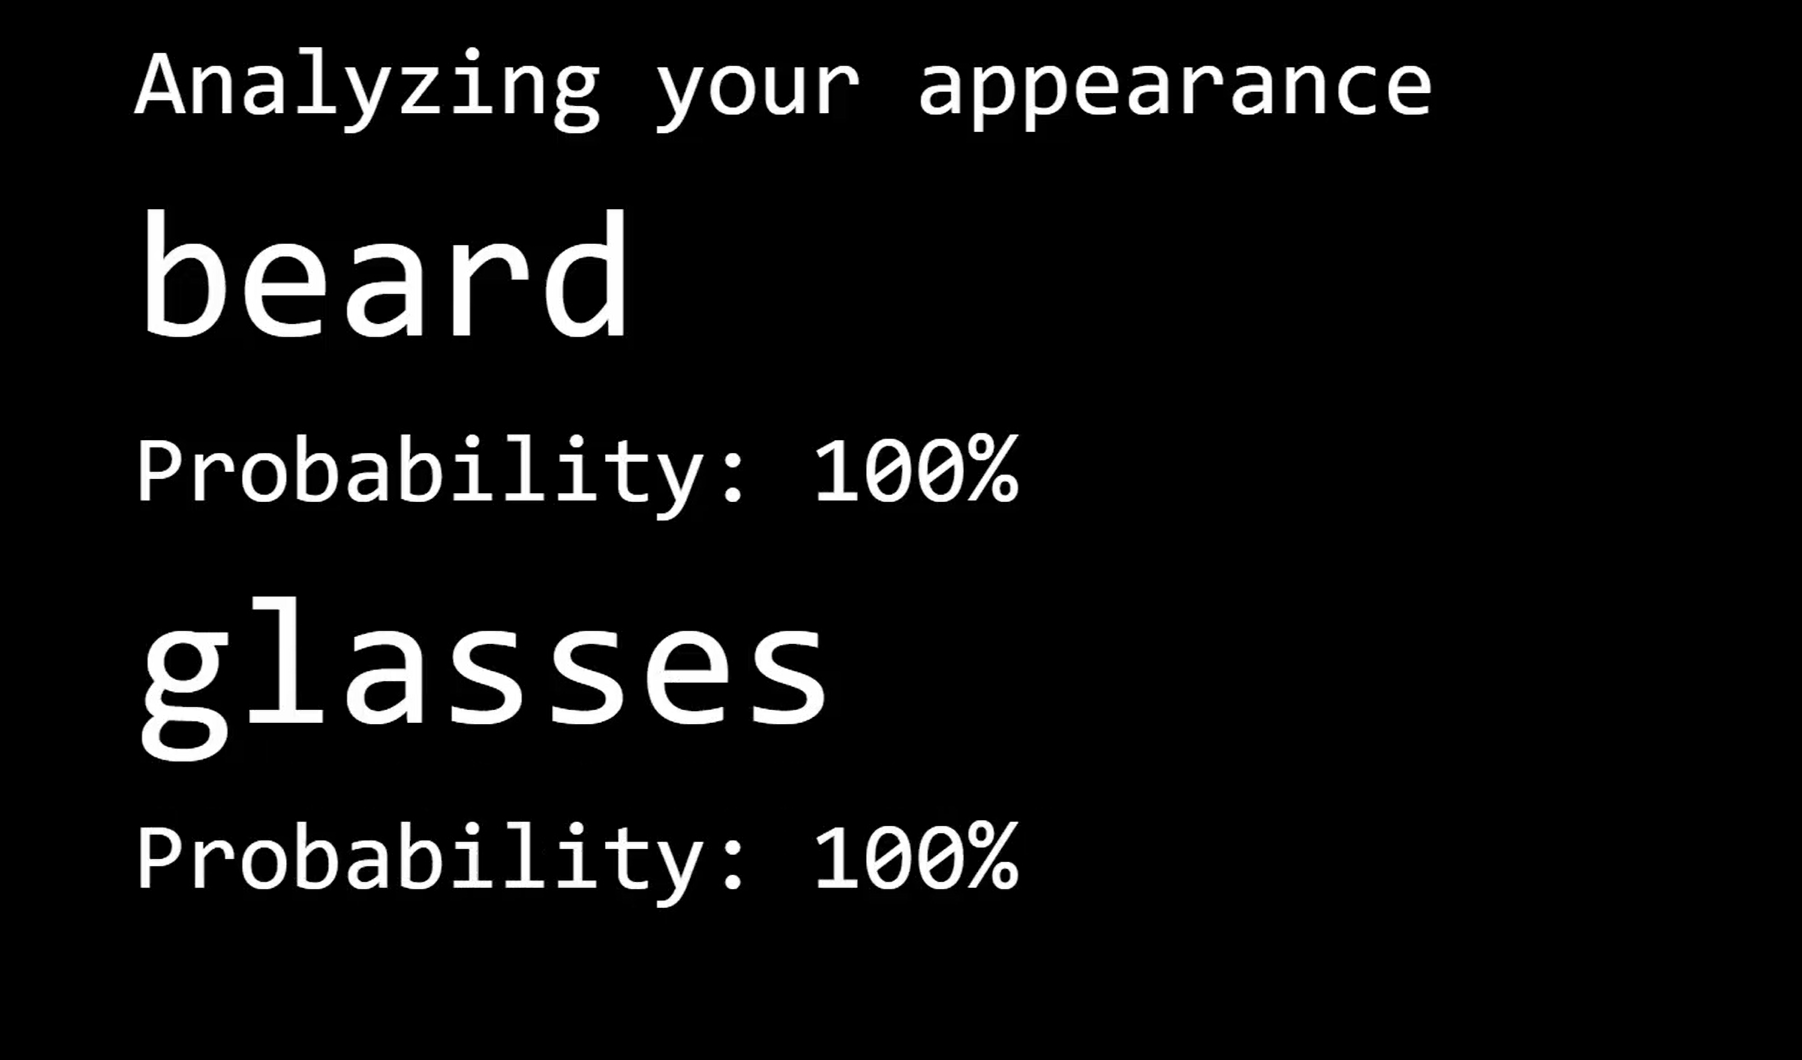
After a few seconds the projection changed and started typing out basic information about the person:
- Their photo, detail of their face.
- Their age and gender.
- Their appearance - glasses, facial hair, dress.
It then ended with a simple message of "Thank you. Your data has been recorded and saved. Goodbye."
After this, the presentation returned to showing general Signal Festival facts.
Architecture
We used a standard IP camera and two Intel NUC mini PCs with Windows 10. All three devices were connected to the same router and had access to each other over LAN and also to the internet.
Software part of the solution consisted of two client applications (UWP capture client and Web-based projection client) and various Azure services.
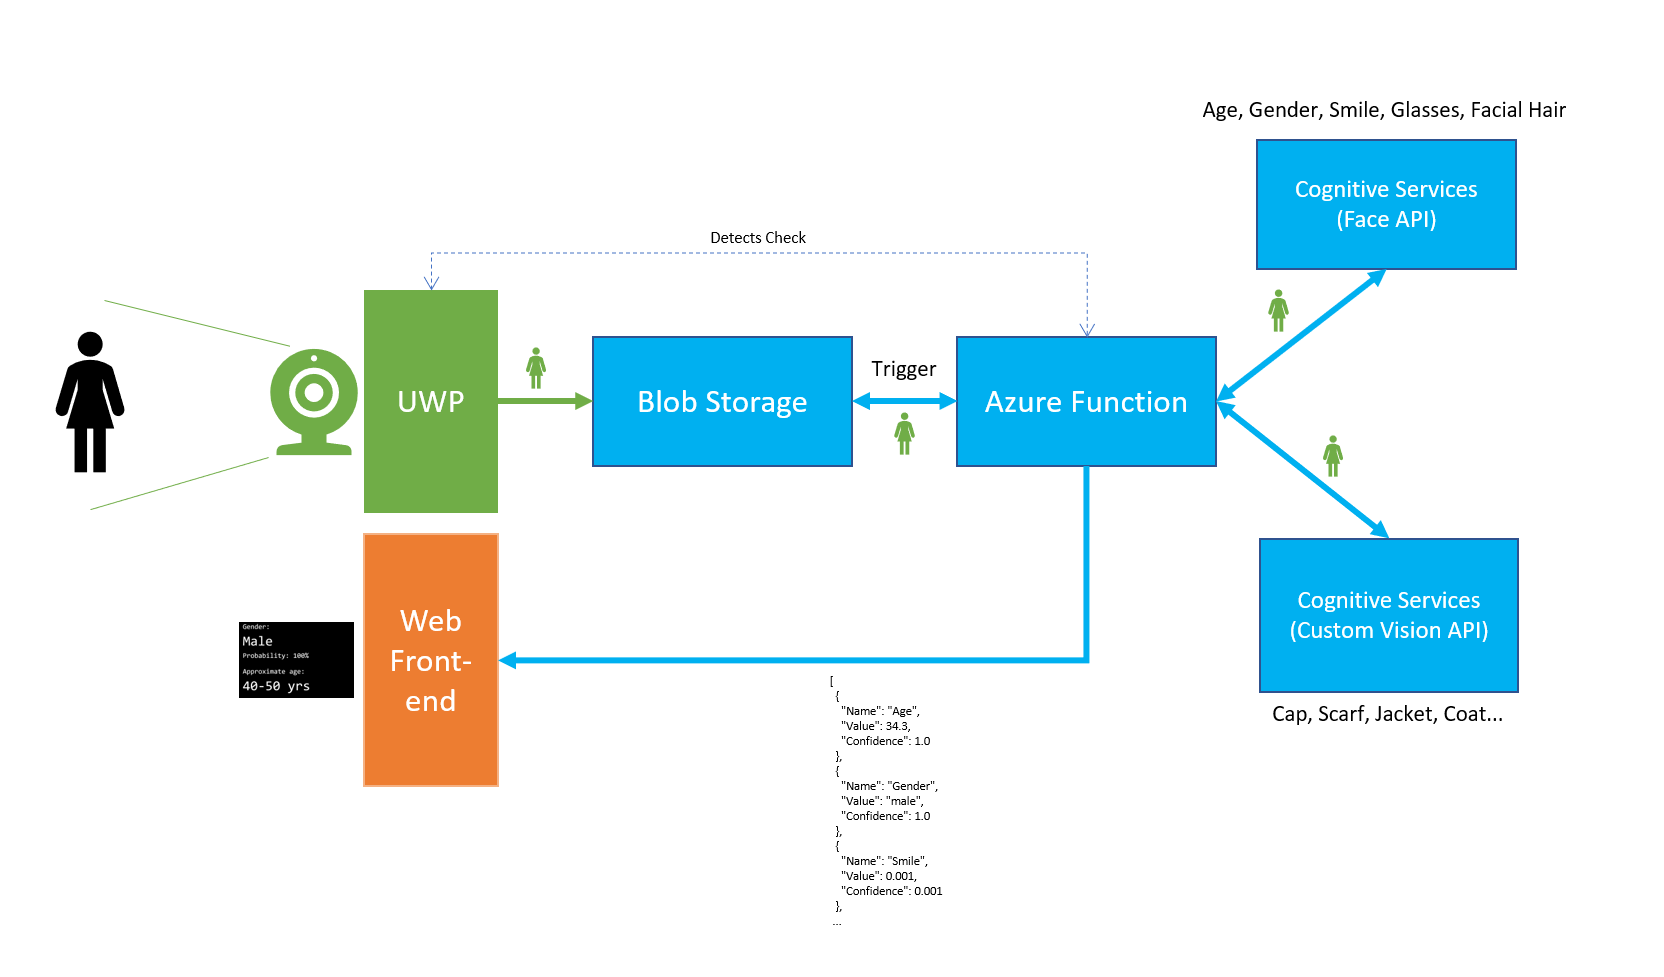
How did it work:
- UWP app detected a face
- UWP app uploaded the face to Azure Blob Storage
- UWP app stopped detection for 30 seconds (estimated duration of processing and presentation)
- Blob triggered an Azure Function
- Azure Function sent the image to Cognitive Services Face API
- Azure Function sent the image to Custom Vision API
- Azure Function combined results from both APIs
- Azure Function saved results to Cosmos DB
- Azure Function posted results to front-end app
- Front-end app displayed results
All was coded in a hackathon-style over the course of a week. This article describes individual parts of this system and their implementation.
Source code can be found on GitHub: https://github.com/msimecek/Signal-Faces
Client App
As mentioned earlier, there were two client apps running on two computers:
- UWP app to capture images from the camera,
- web app to project results back to people.
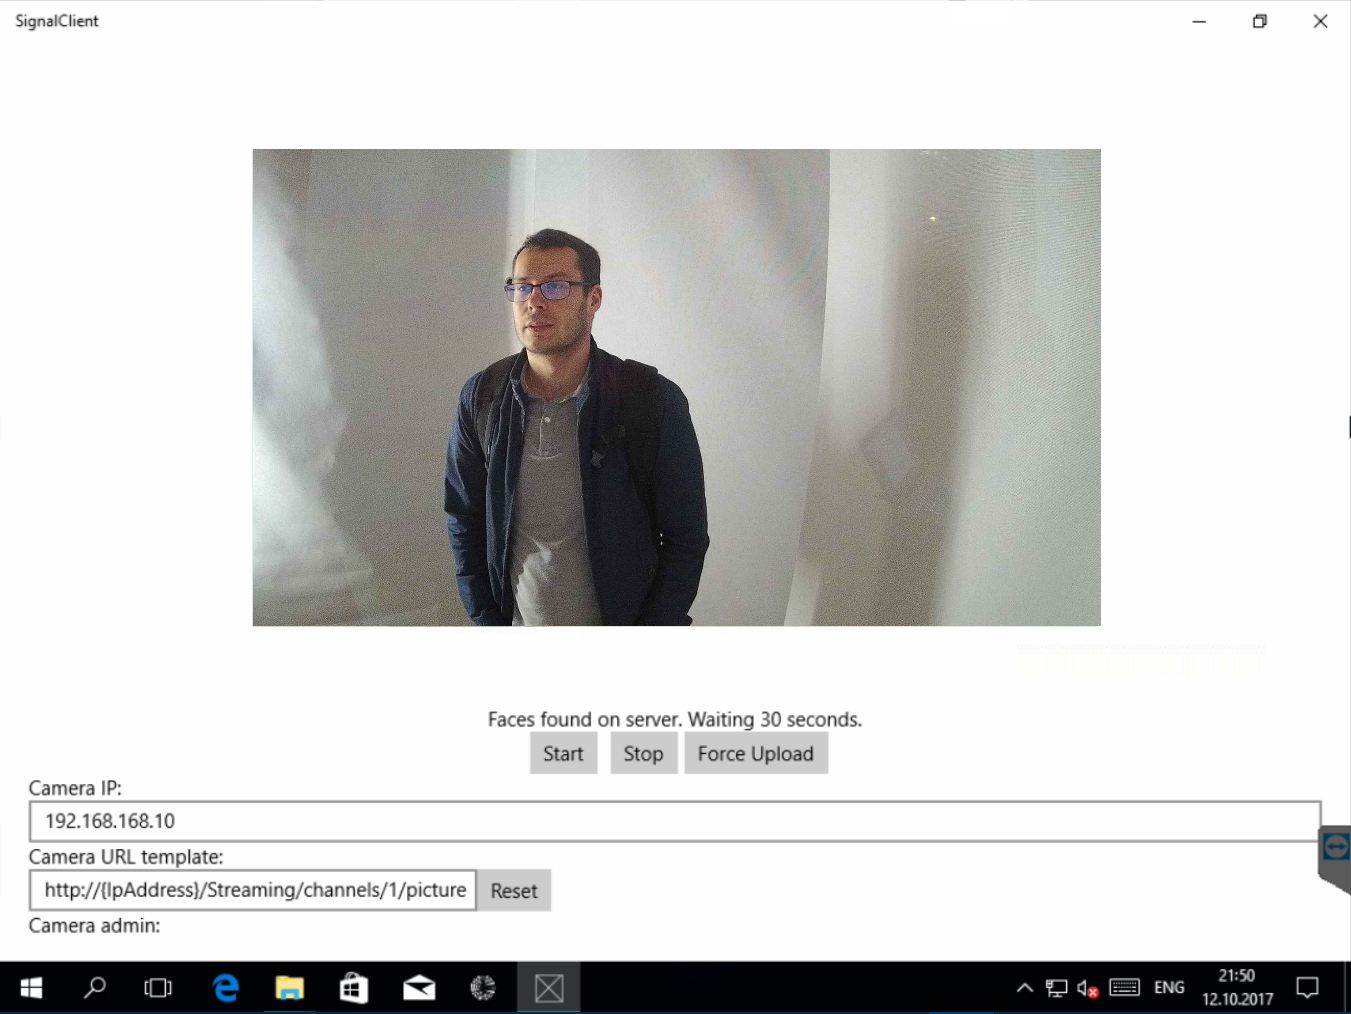
I designed the client to be simplistic, with minimum logic. It starts a capture timer which downloads photo from the camera on each tick, then looks for faces on the photo and if there are any, uploads the photo to Azure Storage.
Timer
if (_captureTimer != null)
    _captureTimer.Cancel();

_captureTimer = ThreadPoolTimer.CreatePeriodicTimer(Timer_Tick, TimeSpan.FromSeconds(_config.CaptureInterval));
Camera
We used an IP camera which exposes its feed as JPEG images at a specific URL:
http://{IpAddress}/Streaming/channels/1/picture
After some testing, we decided to set the capture interval to 2 seconds. This period was enough for the app to download, process and upload every image (approx. 140 kB each). Downside: when a person moved too fast in front of the camera, we missed their face for the first time (making the whole process a little longer).
Face Detection
To reduce uploading, the app first tries to detect faces locally. I used the standard UWP FaceDetector component.
SoftwareBitmap image = await _camera.ConvertStreamToBitmap(bitmapStream);
SoftwareBitmap convertedImage = SoftwareBitmap.Convert(image, BitmapPixelFormat.Nv12);

if (!FaceDetector.IsBitmapPixelFormatSupported(convertedImage.BitmapPixelFormat))
{
    Log($"Unsupported pixel format! ({convertedImage.BitmapPixelFormat})");
    return;
}

var fd = await FaceDetector.CreateAsync();
var faces = await fd.DetectFacesAsync(convertedImage);
if (faces.Count == 0)
{
    // no faces, nothing to do
    Log("No faces detected.", false);
    return;
}
The only catch here was to convert the image to the right pixel format, which in this case was Nv12.
If you'd like to learn more about pixel formats and NV12, check this article by Tomi Paananen.
Azure Blob Storage Upload
I have first manually created a Storage Account with Container in Azure Blob Storage and generated Shared Access Signature (SAS) token for this container.
If there were any faces found on the image, it was uploaded to Azure Blob Storage.
public class StorageService
{
    private const string CONTAINER_SAS = "https://xxx.blob.core.windows.net/photos?st=2017-10-10T07%3A29%3A00Z&se=2017-10-11T07%3A29%3A00Z&sp=rw&sv=2016-05-31&sr=c&sig=xxx";

    public static async Task<string> UploadImageAsync(Stream image)
    {
        var container = new CloudBlobContainer(new Uri(CONTAINER_SAS));
        string fileName = Guid.NewGuid().ToString() + ".jpg";
        CloudBlockBlob blob = container.GetBlockBlobReference(fileName);
        await blob.UploadFromStreamAsync(image);

        return fileName;
    }
}
After Upload
After upload, the app stopped all processing for 30 seconds. Why? We chose this approach after long discussions and brainstorming. Sole purpose of this delay is to prevent from capturing the same person twice...
We evaluated several options of detecting whether the person had left the installation (face identification, proximity sensors, multiple camera streams etc.) and for the sake of time and simplicity decided to include a configurable delay based on our estimate of how long the presentation might last (taking into account 3 seconds to detect face, 4 seconds to process in the cloud and approx. 20 seconds to play the presentation).
Server
Now for the heavy lifting. All the important logic is done on the server side, asynchronously. It consists of two Azure Functions, which were built locally in Visual Studio 2017:

There's a great page in the documentation that shows how local development in VS 2017 works and how to set it up for Functions.
The main Azure Function goes through this process:
- gets photo from Blob Storage as Stream,
- sends photo to Cognitive Services Face API to detect age, facial hair, gender, smile, glasses and face rectangle,
- sends photo to Custom Vision API to detect additional tags (clothing),
- combines results into a JSON document,
- sends JSON to the front-end API,
- saves JSON to Cosmos DB for further analysis.
Azure Functions make it very easy to integrate various Azure (and some non-Azure) services by using proper Triggers and Bindings.
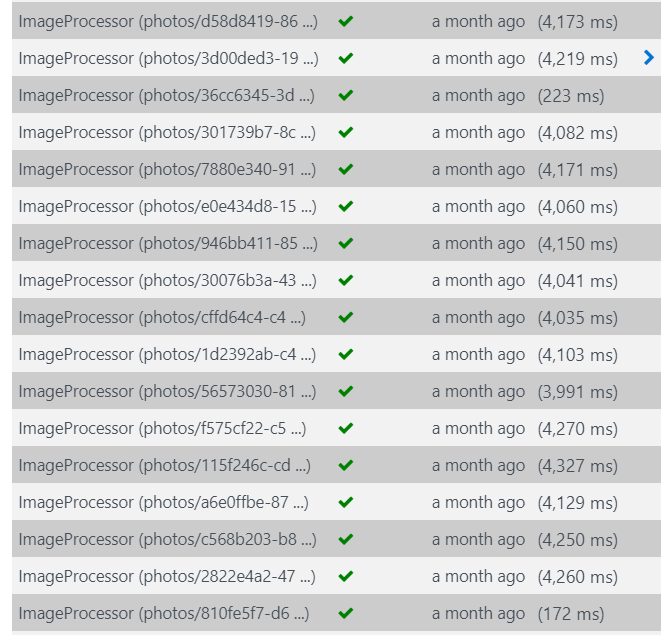
[FunctionName("ImageProcessor")]
public static void Run(
  [BlobTrigger("photos/{name}", Connection = "AzureWebJobsStorage")]Stream photo,
  string name,
  [DocumentDB("SignalData", "Faces", ConnectionStringSetting = "CosmosDbConnection")]out dynamic document,
  [Table("detects", Connection = "AzureWebJobsStorage")]out DetectEntity detectCheck,
  TraceWriter log)
{
  ...
}
This particular function triggers every time a new blob is uploaded to Azure Storage:
[BlobTrigger("photos/{name}", Connection = "AzureWebJobsStorage")]Stream photo
The BlobTrigger binding automatically loads the file to a C# Stream and stores the file's name to parameter string name.
There are also two outputs:
- The first one saves completed JSON document into Cosmos DB database called SignalData, collection Faces.
- Second one writes to Storage Table called detects (I'll explain why later).
Face Recognition
To do face recognition, I used the official Microsoft.ProjectOxford.Face NuGet package.
var faceClient = new FaceServiceClient(
  Environment.GetEnvironmentVariable("FaceAPIKey", EnvironmentVariableTarget.Process),
  Environment.GetEnvironmentVariable("FaceAPIEndpoint", EnvironmentVariableTarget.Process)
);
To call the Face API you need to register it in Azure and copy the key. Also don't forget about the right endpoint - default value can be incorrect and can cause confusing errors.
I saved this information to Application Settings in Azure App Service and loaded it by calling Environment.GetEnvironmentVariable(). Thanks to this I could keep production keys in Azure and local configuration separately in local.settings.json:
{
  "IsEncrypted": false,
  "Values": {
    "AzureWebJobsStorage": "DefaultEndpointsProtocol=https;AccountName=AAA;AccountKey=AAAA;EndpointSuffix=core.windows.net",
    "AzureWebJobsDashboard": "",

    "FaceAPIKey": "AAA",
    "FaceAPIEndpoint": "https://northeurope.api.cognitive.microsoft.com/face/v1.0",
    "PredictionKey": "AAA",
    "PredictionEndpoint": "https://southcentralus.api.cognitive.microsoft.com/customvision/v1.0/Prediction/AAA/image",

    "CosmosDbConnection": "AccountEndpoint=https://AAA.documents.azure.com:443/;AccountKey=AAA;",

    "SaveApiEndpoint": "http://AAA.azurewebsites.net/person",

    "UseTagRecognition": "false"
  }
}
Then I called the DetectAsync() method to find faces on the image:
Face[] detectResult = await faceClient.DetectAsync(
    image,
    returnFaceAttributes:
        new FaceAttributeType[] {
        FaceAttributeType.Age,
        FaceAttributeType.FacialHair,
        FaceAttributeType.Gender,
        FaceAttributeType.Smile,
        FaceAttributeType.Glasses
        },
    returnFaceLandmarks: true);
Important: Don't forget to explicitly list attributes you wish to detect. In my case I had to use four options, otherwise I got only the face rectangle (position).
The function then compiles first set of tags - Age, Gender, Smile, Glasses (0 or 1, regardless of type) and FacialHair (Beard or Moustache).
Additional Tagging
I have experimented with Custom Vision service for additional tagging.
Custom Vision is a classifier, which means that it can label the whole image, but it cannot detect specific objects and their location in the picture.
There was no official NuGet package available for Custom Vision at the time of building the project, so I've just created a simple wrapper, called CustomVisionClient (GitHub). It calls the prediction endpoint and returns a list of predicted tags along with their probability.
Then I took the first 4 results and put them into the final list of Tags.
// Send image to Custom Vision
var predictionClient = new CustomVisionClient(
    Environment.GetEnvironmentVariable("PredictionKey"),
    Environment.GetEnvironmentVariable("PredictionEndpoint"));

PredictionResult predRes = predictionClient.PredictAsync(photo).Result;

if (predRes == null)
{
    log.Info("Prediction result empty.");
}
else
{
    // Put results into single JSON
    // - results coming from API are ordered by Probabilty, taking first 4
    var firstResults = predRes.Predictions.Take(4);
    foreach (var pr in firstResults)
    {
        string category = CategoryMapping.Where(c => c.Value.Contains(pr.Tag)).FirstOrDefault().Key;
        result.Tags.Add(new Tag(category, pr.Tag, pr.Probability));
    }
}
More interesting part was happening on the Custom Vision portal where you build, train and evaluate your model.
The initial idea was to train the model to recognize 16 types of clothing and accessories - shirts, coats, jackets, suits, scarves, umbrellas etc. Since we didn't have any real samples, we just used images from the internet.
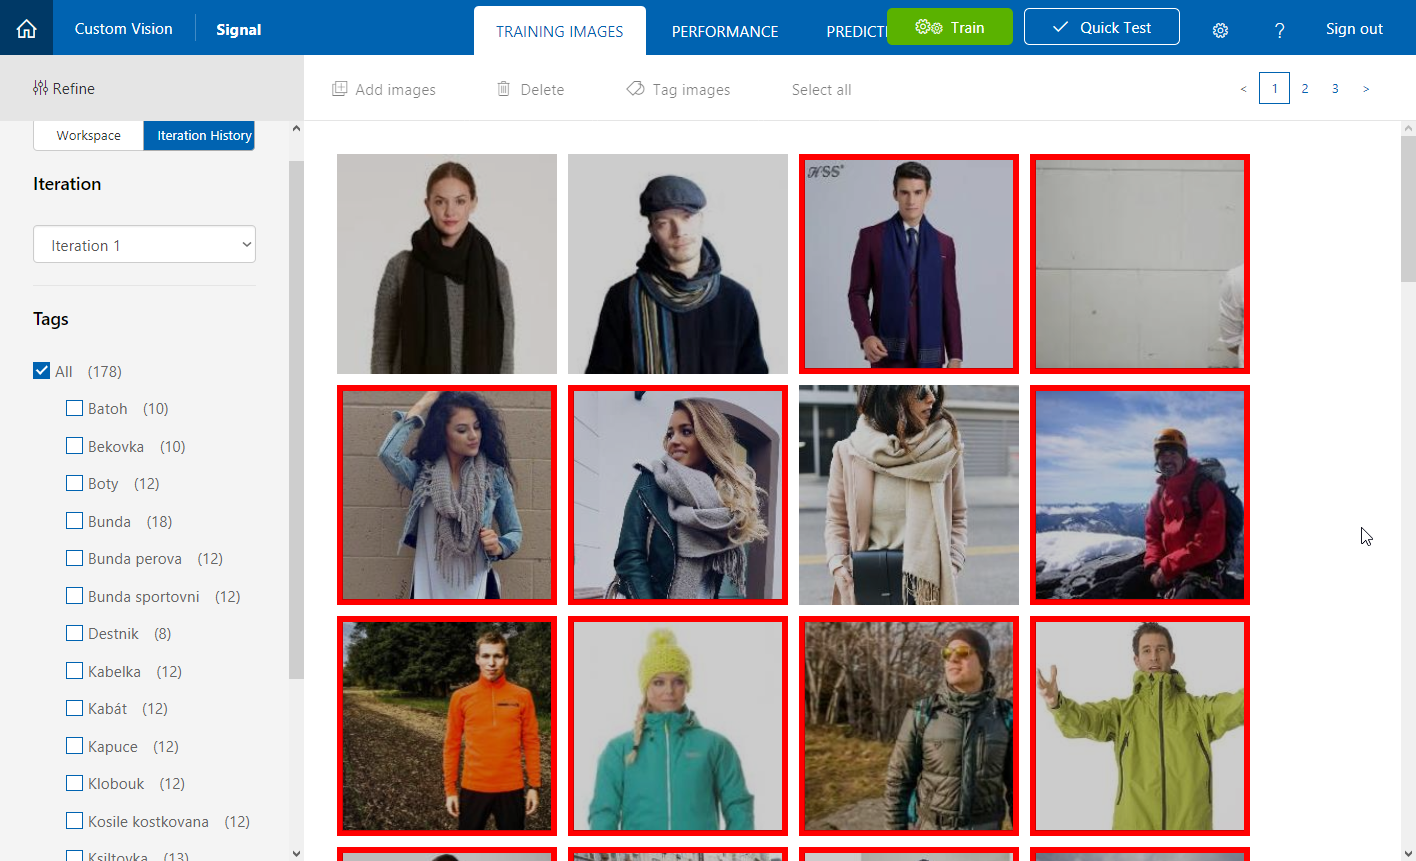
First iteration:
- 178 images
- 16 tags
- precision: 55.3%
- recall: 16.3%
Precision deterimines how likely is that the tag prediction is correct. Recall tells us what percentage of tags was predicted correctly.
Not very good.
For the second interation, we added more pictures - 208 total. Each tag had approx. 13 images, one image was assigned multiple tags.
- 208 images
- 16 tags
- precision: 48.3% (-7%)
- recall: 27.6% (+11.3%)
Still not good, but at least we got some results to work with.
For iteration 3 we removed some images, reduced the number of tags to 9 and assigned only one tag per image.
- 189 images
- 9 tags
- precision: 58.9% (+10.6%)
- recall: 34.5% (+6.9%)
Getting better. Unfortunately, there was no more time to test on artificial images, so we went to production. First day of the installation and first real images. And they were very different from our stock photos!
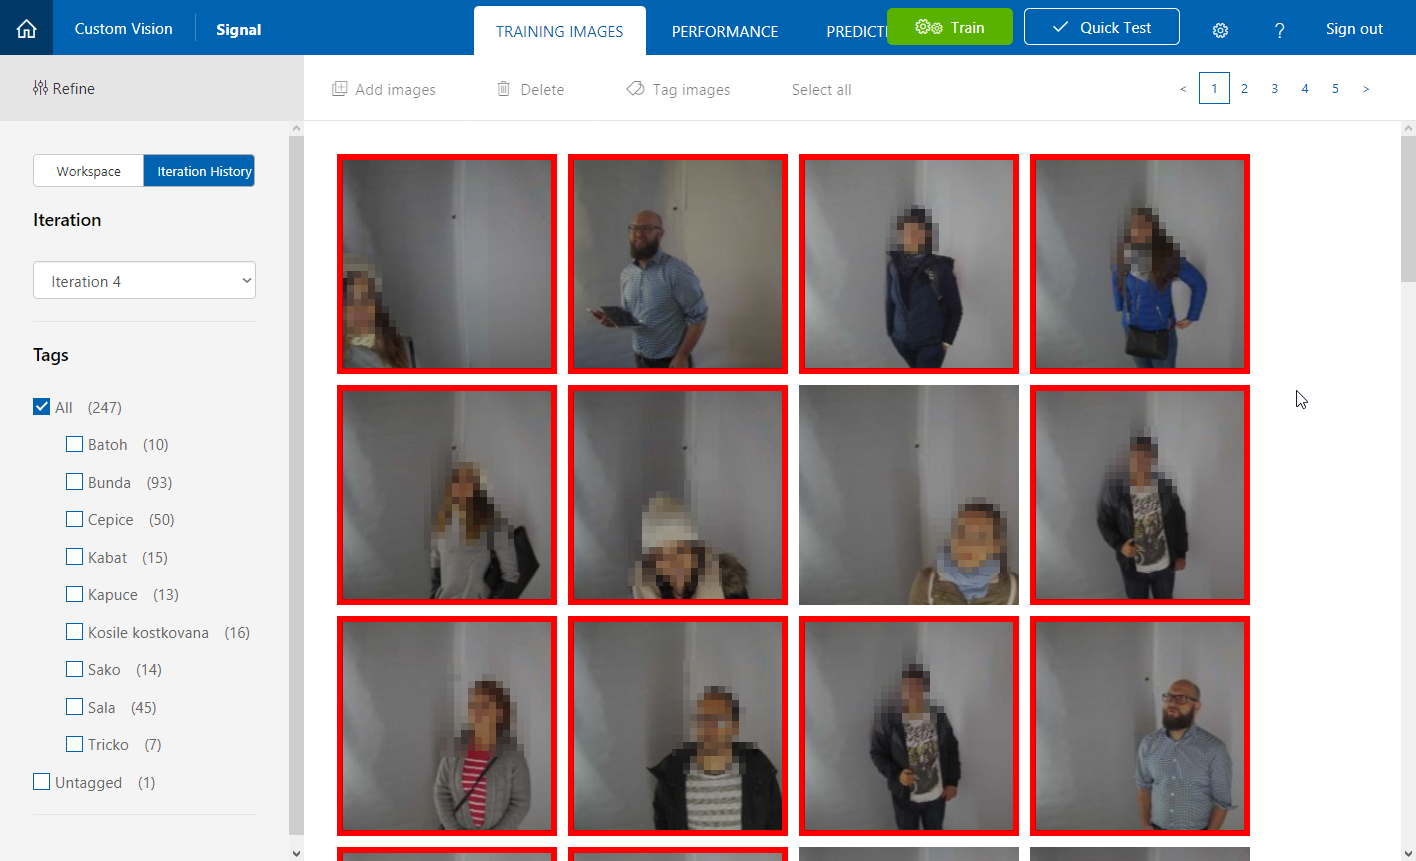
Fourth iteration with first batch of real images from the camera. They replaced most of the stock photos.
- 247 images
- 9 tags
- precision: 61% (+2.1%)
- recall: 37.8% (+3.3%)
Tags with most images are Bunda (jacket), Cepice (cap) and Sala (scarf) - no wonder, given the season (middle of October) and time of day (night), most people were dressed in a similar way.
Most people were told they wore a cap (even some women with long hair...). Adjustments needed!
On the second day, I established a final set of tags - 7 most distinctive pieces of clothing (such as scarf, cap, coat, suit).
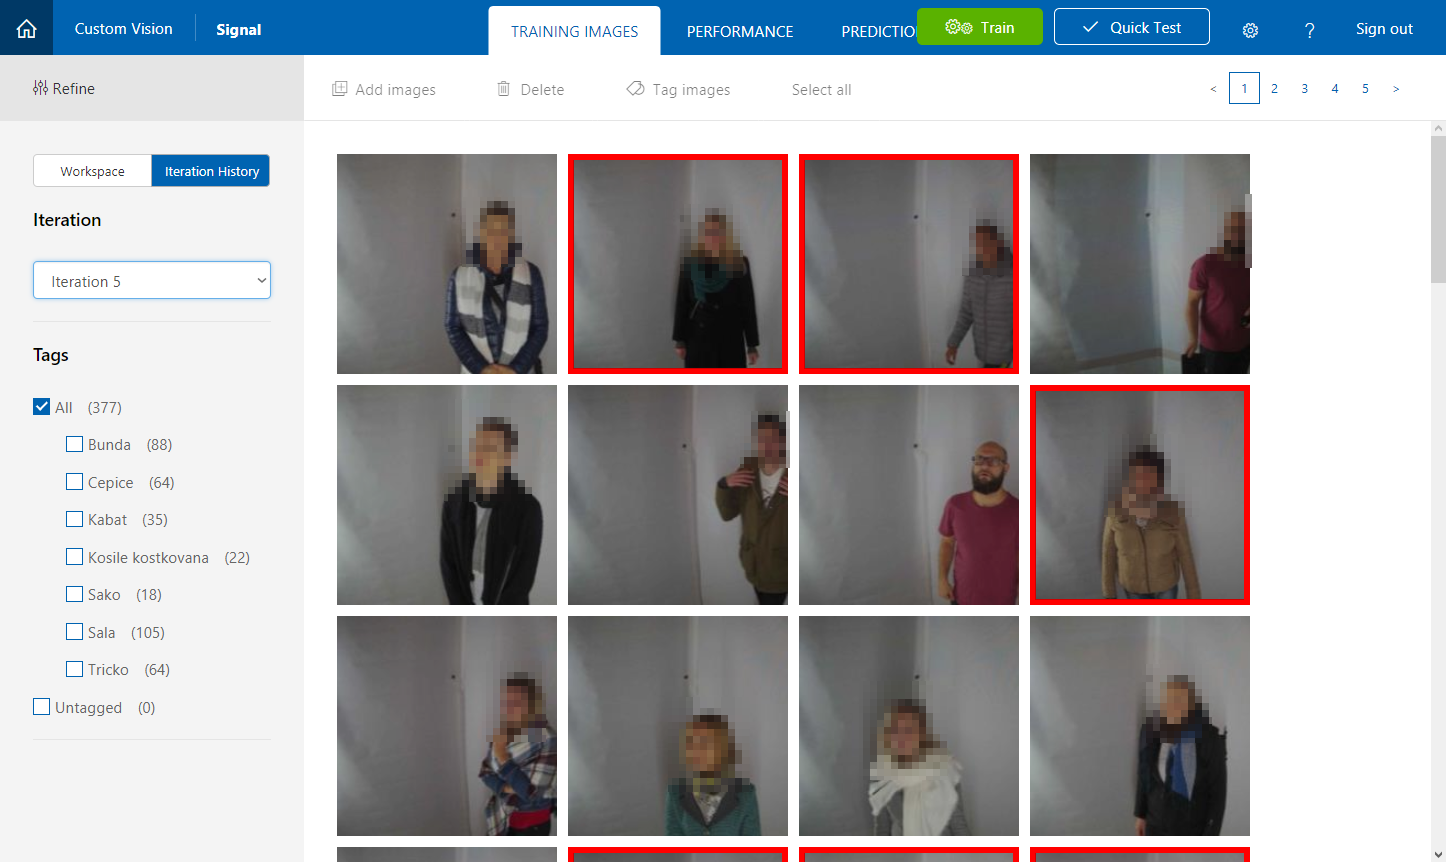
Iteration 5:
- 377 images
- 7 tags
- precision: 64.5% (+3.5%)
- recall: 32.5% (-5.3%)
Now scarf become the most tagged item and it showed in the results - most people were told that they wore a scarf.
I tried to fine-tune the model once more (to balance the tags more evenly) and retrained it with final set of pictures from day three.
Iteration 6:
- 341 images
- 7 tags
- precision: 63.5% (-1%)
- recall: 26.8% (-5.7%)
Summary
Given my dataset, reducing the number of tags improved results, because it reduced the level of detail (t-shirt / sweatshirt / suit vs. t-shirt only). Adding more images into the dataset would probably improve performance, but only when balanced between all tags, which proved to be very difficult because most people were dressed similarly.
Sending to front-end
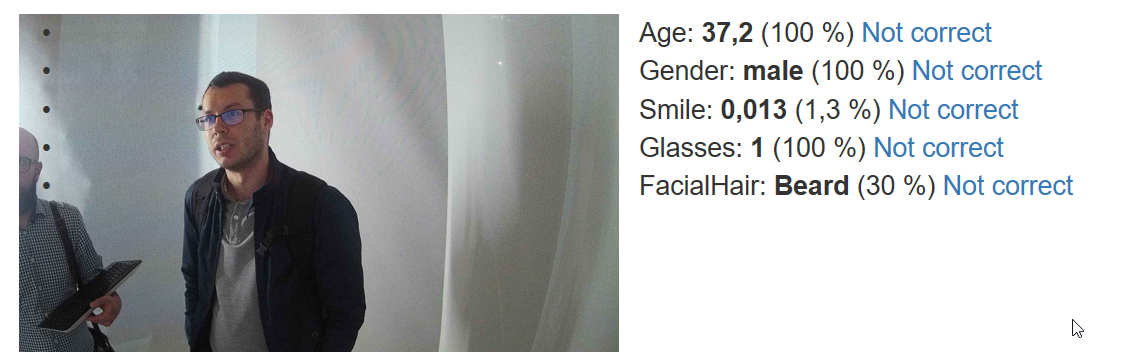
Finally, with all tags determined, the function sent them as JSON to a PHP API:
[
  {
    "Name": "Age",
    "Value": 34.3,
    "Confidence": 1.0
  },
  {
    "Name": "Gender",
    "Value": "male",
    "Confidence": 1.0
  },
  {
    "Name": "Smile",
    "Value": 0.001,
    "Confidence": 0.001
  },
  {
    "Name": "Glasses",
    "Value": 1,
    "Confidence": 1.0
  },
  {
    "Name": "FacialHair",
    "Value": "Beard",
    "Confidence": 0.5
  },
  {
    "Name": "Outerwear",
    "Value": "Tricko",
    "Confidence": 0.212495789
  },
  {
    "Name": "Outerwear",
    "Value": "Bunda",
    "Confidence": 0.03866178
  },
  {
    "Name": "Accessories",
    "Value": "Sala",
    "Confidence": 0.0258482881
  },
  {
    "Name": "Outerwear",
    "Value": "Sako",
    "Confidence": 0.006391721
  }
]
The API then changed the front-end accordingly:
Front-end application on a screen
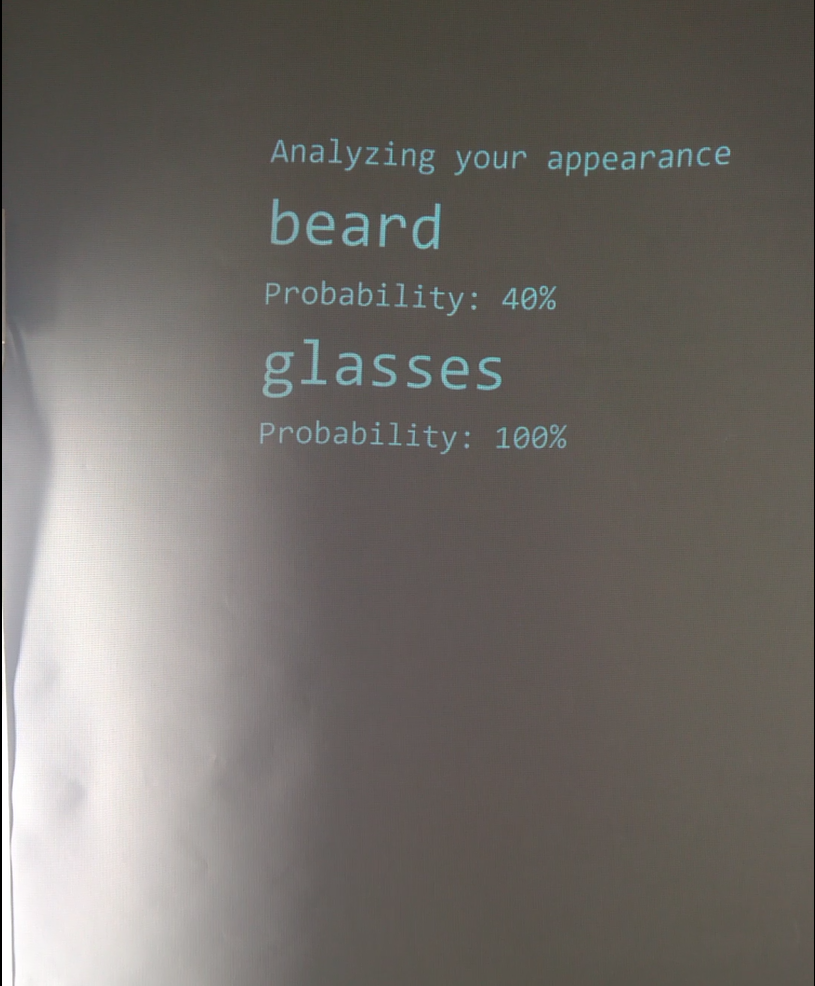
Front-end application in reality
Duration
This whole process took 4 seconds in average. Most of this time was spent on the Custom Vision API (which was still in Preview and had longer latency). Shorter runs are caused by the lack of faces on a particular image.
This Azure Function was running on the Consumption plan and didn't fail once!
Detection Check
Originally, the UWP capture app wasn't waiting for any response from the server. It just uploaded the picture and was done with it. After a few tests, we noticed that it can happen that although the client sees faces, the server doesn't. And so the checking mechanism was built.
It's a very simple Azure Function, triggered by HTTP request:
[FunctionName("DetectsCheck")]
public static async Task<HttpResponseMessage> Run(
    [HttpTrigger(AuthorizationLevel.Anonymous, "get", Route = "DetectsCheck/{imageName}")]HttpRequestMessage req,
    string imageName,
    [Table("detects", " ", "{imageName}", Connection = "AzureWebJobsStorage")] DetectEntity detect,
    TraceWriter log)
{
    if (detect == null)
        return req.CreateResponse(HttpStatusCode.OK, DetectEntity.DetectState.NotProcessed);

    return req.CreateResponse(HttpStatusCode.OK, detect.Faces);
}
It's supposed to be super fast: get only one row from Storage Table and return the number of faces detected on this image.
[HttpTrigger(AuthorizationLevel.Anonymous, "get", Route = "DetectsCheck/{imageName}")]HttpRequestMessage req
This attribute implies that the functions expects to get the image name as URL parameter: https://signalapi.azurewebsites.net/api/DetectsCheck/123445789.jpg.
Then it grabs the status line from a Table using Functions input binding:
[Table("detects", " ", "{imageName}", Connection = "AzureWebJobsStorage")] DetectEntity detect
(All records were placed in a single partition, as there weren't that many, and imageName happened to be the RowKey.)
DetectEntity:
public class DetectEntity : TableEntity
{
    public int Faces { get; set; }

    public DetectEntity() { }

    public DetectEntity(string fileName, int faces)
    {
        this.PartitionKey = " ";
        this.RowKey = fileName;
        this.Faces = faces;
    }

    public enum DetectState
    {
        NotProcessed = -1,
        NoFaces = 0
    }
}
And it was very fast indeed:

Analysis
In production, we took 1607 pictures. Most of them are individual people, a few were captured more than once. To evaluate the quality of results, I've built a simple web app which loaded all the images and their corresponding tags. Then I went through all pictures and tagged those properties, which were labelled incorrectly.
Disclaimer: This process is very subjective - there's usually no doubt about gender, but I'm generally bad at guessing people's age, so I marked as incorrect only those values that were obviously off. Different person would mark it differently for sure.
Gender
- correct: 1528
- incorrect: 79
Only 5.2% of people were assigned incorrect gender (male/female). Doesn't look too bad, right? But imagine being that lady who was just told that she looks like a man...
When we dig deeper into data, it's clear that the mistake happened mostly in the direction female > male (i.e. more women were told that they're men than the other way around). Also age played a role in it:
- false males: 69
- average age: 41.02
- false females: 10
- average age: 14.08
- (Most false female tags were caused by the person's young age.)
Glasses don't affect results significantly:
- false gender with glasses: 32
- false gender without glasses: 47
Context is very important in improving precision. While humans look at the whole figure and are able to distinguish between genders by clothing and other features when not certain, APIs look at the face only which makes them more prone to error.
Age
The age value is largely affected by lighting conditions and distance from the camera. I discovered during the evaluation that faces which were close to the camera and well lit had most precise results. The rest (which was most of our pictures) were assigned slightly higher age: 5-10 years, more for women, less for men.
If we had more time before starting the installation we would definitely "calibrate" it for the lighting situation on-site (by reducing the age shown by 5-10 years, depending on gender).
Completely off were 303 photos.
Learnings:
- less light = higher age
- closer to the camera = more accurate
- never show the actual value to the user, calibrate if changed light
Glasses
Glasses detection proved to be very accurate: only 2 vere detected incorrectly.
Smile
Very subjective. Results were mostly correct, in general - if someone shows their teeth, they're smiling :)
Wrap Up
The installation ran for four days and more than 1600 people came to visit. Even though some of them were not happy with the age shown, some didn't really undersand the concept and other just went through without stopping and thinking, overall it was a success. The technology proved to be working and I've got plenty of learnings and possible improvements for future projects.
Next time, I would definitely push to have more time for testing with final conditions and adjust processing accordingly.
Feedback
Found something inaccurate or plain wrong? Was this content helpful to you? Let me know!
📧 codez@deedx.cz